Overview: Connecting Azure SQL to Jet Reports
To utilize Jet Reports for accessing your Azure SQL Database, you first need to create a Universal Data Source connection. This allows Jet Reports to fetch data directly from your Azure-hosted database for dynamic reporting.
Before you begin, ensure you’ve:
Installed the latest version of Jet Reports from the insightsoftware download site.
Collected the following prerequisites:
Jet License Activation Code
Azure SQL Database Details:
Server Name
Database Username and Password
Step-by-Step: Create an Azure SQL Data Source in Jet Reports
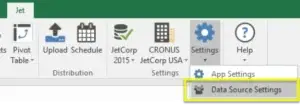
1. Open Data Source Settings in Jet Reports
Launch Excel and go to the Jet ribbon.
Select Settings > Data Source Settings.

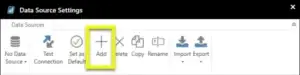
2. Add a New Data Source
In the Data Source Settings window, click Add.

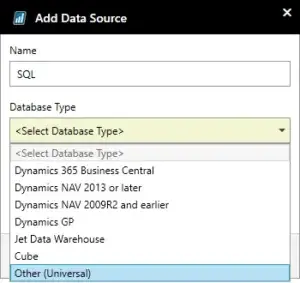
In the New Data Source window:
Name your data source (e.g., “AzureSQL_Production”).
For Type, select Other (Universal).
Click OK.

3. Configure the Data Source
Back in the Data Source Settings window, click Configure….
The Data Link Properties window will open.

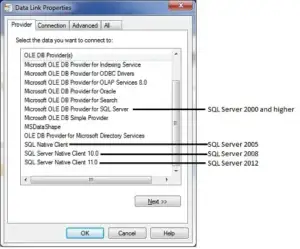
4. Choose the Correct Provider
On the Provider tab, choose SQL Server Native Client 11.0.
⚠️ If this option is not available, download it from Microsoft:
Using older providers may reduce functionality, so using SQL Server Native Client 11.0 is recommended for Azure SQL compatibility.
5. Set Connection Details
On the Connection tab:
Server Name:
your_server_name.database.windows.netUser Name:
your_username@your_server_namePassword:
Enter your database password and check “Allow saving password”.
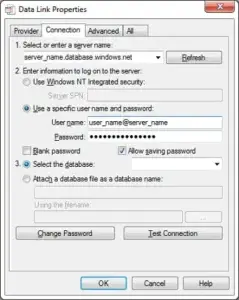
If the password doesn’t save, go to the All tab and set:
Persist Security Info = True
6. Test the Connection
Click the Test Connection button.
A success message (“Test Connection Succeeded”) should appear.


Click OK to confirm and return to the Data Source Settings window.
Licensing and Defaults
If you see “You are not licensed for this data source”, click the message to troubleshoot using license information.
To make this Azure SQL Data Source your default for Jet Reports, click Set Default.
Click OK to finalize.
Your Azure SQL Data Source is Ready!
You’ve now successfully created an Azure SQL Data Source in Jet Reports. You can begin building real-time, dynamic reports using your Azure-hosted data directly in Excel.
Why Use Azure SQL with Jet Reports?
Cloud-Powered Reporting – Access real-time data from anywhere.
Secure Connection – Rely on Azure’s enterprise-grade security.
High Performance – Optimize large data sets for fast analysis.


