A practical, step-by-step help-center guide explaining Static Row Level Security (RLS) in Power BI what they are, when to use each, how to implement them (with DAX examples), how to test and deploy and common pitfalls to avoid.
What is RLS?
Row-Level Security (RLS) controls which rows of data a report user can see. In Power BI, RLS is implemented at the dataset level and filters data for users without changing the underlying data source. One over more ways is to implement object-level security in Power BI. There are two common approaches for RLS:
- Static RLS: Roles are defined with fixed filters (e.g., Region= “West”). Assign specific user accounts to each role in the Power BI Service.
- Dynamic RLS: Filters use DAX expressions that depend on the current user (e.g., USERPRINCIPALNAME()) so one role can serve many users with different data scopes. Find complete guide on: Dynamic RLS in Power BI.
In this article we will only be learning about Static RLS
Roles and filters
RLS implementation is based on three core elements:
- Roles: Logical groupings with defined access rules.
- DAX filters: Expressions that determine what data each role can access.
- User assignments: Configuration of which users or groups belong to which roles.
Static RLS — Overview
Best for: small number of groups or roles where each role maps to a specific, static data slice (e.g., Finance, HR, Sales Managers). Simple to implement and manage when roles and user membership change infrequently.
Step-by-step: Implement Static RLS in Power BI Desktop:
- Open Power BI Desktop and load your data model.
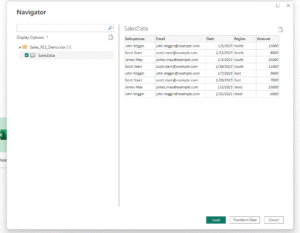
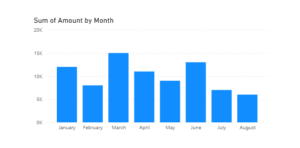
- Create a Column Chart
- Drag the Date field to the X-axis and the Sales
- Amount to the Y-axis. Here’s what your chart should look like:
- Creating Roles
Next, let’s create some roles to define which roles can have what permissions.
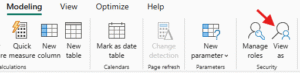
- Go to Modeling > Manage Roles.
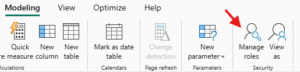
- Click the New button and name your role , e.g. John Miggin
- Select the table
- Enter the DAX expression that filters the Salesperson
SalesData[Email] = miggin@example.com
- Click Save, and add any additional roles if required.
This is how your interface will look like . 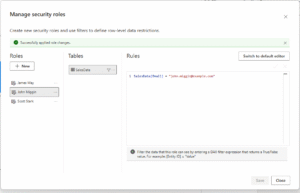
- Testing roles
- Go to Modeling > View as Roles.
- Choose any Salespersons role we created earlier.
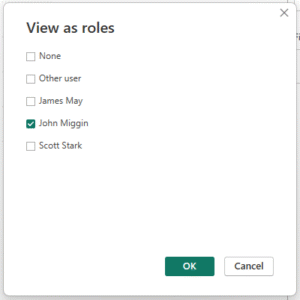
- Press OK to view reports filtered by that role.
As you can see , the chart has been filtered to show only data where the email is “ “john.miggin@example.com“ 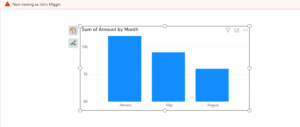
- Publishing the report to Power BI Service
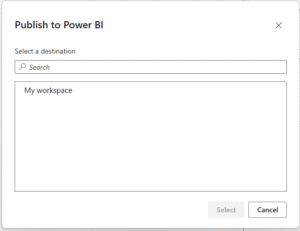
- In Power BI Desktop, click on Home > Publish > To Power BI.
- Choose the target workspace in your Power BI Service.
 Here’s what It looks like on the Power BI Service
 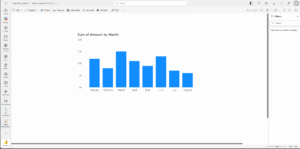 Publishing is a prerequisite for configuring RLS role assignments, as the roles defined in Power BI Desktop are transferred along with the dataset.
6. Assign users to roles in Power BI Service:
- Select the More options menu for your relevant semantic model. Click the ellipsis (…) next to the dataset and select Security.
- You’ll see a list of roles defined in Power BI Desktop.
- To assign users, enter their full email addresses in the text box under the desired role, press Enter, and click Add
- To assign AAD groups, use the name of the group (e.g., Region_West, Finance Team). Do ensure that the group is already defined and maintained in Azure Active Directory.
Because the dataset only had dummy email addresses—and Power BI Service requires real, valid emails for assigning roles, I manually added a valid user in this RLS interface. 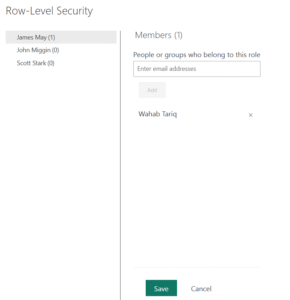
- Verify: Verify by testing the role assignments
- On the same page, click on your RLS name you defined earlier and click on the ellipsis (…), and then Test as role.
- Power BI will open a read-only version of the report showing only the data permitted by the selected role.
👉 Join our Power BI Training and gain hands-on skills to turn insights into action.
Pros & cons of Static RLS:
- Pros: Simple to create and understand; easy debugging; works with any identity provider if you add users manually.
- Cons: Hard to manage at scale (many users/roles); manual assignment can be time-consuming; not suitable when users’ scope changes frequently.
Common Pitfalls in Static RLS :
- Using invalid or dummy email addresses that cannot be assigned to roles in the Power BI Service.
- Forgetting to assign users to roles after publishing the dataset to Power BI Service.
- Misconfigured or missing relationships that prevent RLS filters from flowing through the model.
- Using filter columns that don’t match actual dataset values, causing roles to show unexpected or no data.
Conclusion:
Wrapping up, static row-level security (RLS) in Power BI is a key method for ensuring data governance within the platform. It allows organizations to deliver personalized, secure analytics experiences within a single report or dashboard, without compromising the confidentiality or integrity of underlying data.


