Overview: Connecting Azure SQL to Jet Reports
To utilize Jet Reports for accessing your Azure SQL Database, you first need to create a Universal Data Source connection. This allows Jet Reports to fetch data directly from your Azure-hosted database for dynamic reporting.
Before you begin, ensure you’ve:
-
Installed the latest version of Jet Reports from the insightsoftware download site.
-
Collected the following prerequisites:
-
Jet License Activation Code
-
Azure SQL Database Details:
-
Server Name
-
Database Username and Password
-
-
Step-by-Step: Create an Azure SQL Data Source in Jet Reports
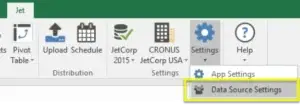
1. Open Data Source Settings in Jet Reports
-
Launch Excel and go to the Jet ribbon.
-
Select Settings > Data Source Settings.

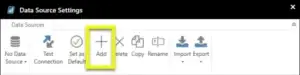
2. Add a New Data Source
-
In the Data Source Settings window, click Add.

-
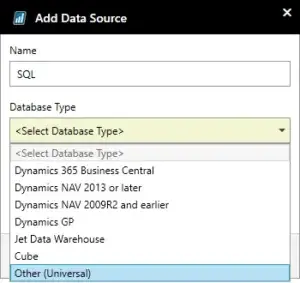
In the New Data Source window:
-
Name your data source (e.g., “AzureSQL_Production”).
-
For Type, select Other (Universal).
-
Click OK.

-
3. Configure the Data Source
-
Back in the Data Source Settings window, click Configure….
-
The Data Link Properties window will open.

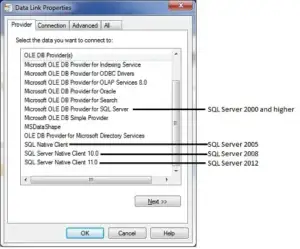
4. Choose the Correct Provider
-
On the Provider tab, choose SQL Server Native Client 11.0.
⚠️ If this option is not available, download it from Microsoft:
Using older providers may reduce functionality, so using SQL Server Native Client 11.0 is recommended for Azure SQL compatibility.
5. Set Connection Details
On the Connection tab:
-
Server Name:
your_server_name.database.windows.net -
User Name:
your_username@your_server_name -
Password:
Enter your database password and check “Allow saving password”.
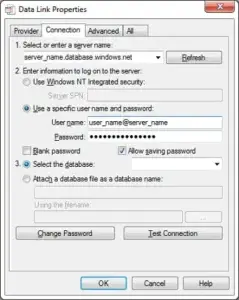
If the password doesn’t save, go to the All tab and set:
-
Persist Security Info = True
6. Test the Connection
-
Click the Test Connection button.
-
A success message (“Test Connection Succeeded”) should appear.

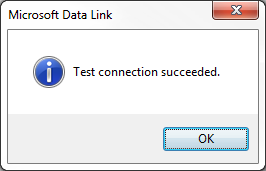
Click OK to confirm and return to the Data Source Settings window.
Licensing and Defaults
-
If you see “You are not licensed for this data source”, click the message to troubleshoot using license information.
-
To make this Azure SQL Data Source your default for Jet Reports, click Set Default.
-
Click OK to finalize.
Your Azure SQL Data Source is Ready!
You’ve now successfully created an Azure SQL Data Source in Jet Reports. You can begin building real-time, dynamic reports using your Azure-hosted data directly in Excel.
Why Use Azure SQL with Jet Reports?
-
Cloud-Powered Reporting – Access real-time data from anywhere.
-
Secure Connection – Rely on Azure’s enterprise-grade security.
-
High Performance – Optimize large data sets for fast analysis.
If You Need Any Help, Contact us Now!


