
Microsoft Power Apps lets you connect to a wide variety of data sources from Excel files stored on OneDrive, your Dataverse or to enterprise-grade databases. For simple prototypes or very small datasets, Excel is a convenient starting point. However, as an app grows in scale, number of users, or data complexity, Excel quickly reveals serious limitations that can affect app reliability, data integrity and user experience.
This article explains why Microsoft Dataverse is the recommended data source for production-ready Power Apps, outlines the key limitations of Excel that make it unsuitable for larger or more serious applications, and walks you through the step-by-step process of connecting your Power Apps app to a Dataverse table.
1. The Problem with Using Excel in Power Apps
Excel is a familiar tool, and connecting a Power Apps Canvas app to an Excel workbook stored on OneDrive is fast and requires no setup beyond having the file accessible. For quick internal tools or personal productivity apps with a handful of rows, this is perfectly reasonable. The problems begin when the app starts to grow.
– The 2,000-Row Delegation Limit
The most significant and most commonly misunderstood limitation of Excel as a Power Apps data source is what Microsoft calls the delegation limit. In Power Apps, ‘delegation’ refers to whether a data query, a filter, a search, a sort, is evaluated on the data source’s server or on the user’s local device.
When a query is delegable, Power Apps sends the conditions to the server and receives only the matching rows. When a query is non-delegable (as most Excel queries are), Power Apps fetches a batch of rows to the device and then filters them locally. The maximum number of rows Power Apps will ever fetch from a non-delegable source is 2,000 regardless of how many rows actually exist in the file.
⚠ Important: This 2,000-row ceiling is a hard limit. It can be adjusted in App Settings → Advanced → Data row limit for non-delegable queries to any value up to 2,000, but it cannot be increased beyond 2,000 under any circumstances.
The result: if your Excel table has 5,000 rows, Power Apps will only ever see the first 2,000. Any search, filter, or count formula will silently return incomplete results with no error message, no warning to the user, and no indication that data is missing.
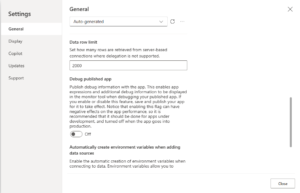
– Silent Data Loss — The Most Dangerous Failure Mode
What makes the delegation limit particularly problematic is that it fails silently. Power Apps does not display an error when a query hits the row ceiling. The app appears to work correctly gallery screens show results, KPI counters show numbers, and searches return matches but all of these results are based only on the subset of rows that was fetched, not the full dataset.
For example, a count formula intended to count all active listings might return 47 when the real number is 312, simply because only the first 2,000 rows were evaluated. A broker searching for a property that exists in row 3,500 of the Excel file will find nothing not because the property doesn’t exist, but because Power Apps never fetched that row.
💡 Tip: To test whether your app is affected by the delegation limit, compare the result of a simple row-count formula in the app against the known total row count in your Excel file. If they differ, the delegation limit is causing silent data loss.
– No Multi-User Concurrency
Excel is a single-user file format. When a Power Apps application connects to an Excel workbook on OneDrive and multiple users interact with it simultaneously adding records, editing listings, submitting forms they are all reading and writing to the same file. Excel has no built-in mechanism to handle concurrent writes gracefully.
In practice this leads to data corruption, overwritten records, ‘file is locked’ errors, and lost submissions especially in apps where multiple people are creating or editing records at the same time, which is exactly the scenario most business apps are designed for.
– No Referential Integrity or Data Validation at the Database Level
Excel columns accept any value — a broker can type ‘actve’ instead of ‘ACTIVE’, add a trailing space, use inconsistent capitalization, or leave a required field blank. There is no mechanism in Excel to enforce that a status column can only ever contain ‘ACTIVE’, ‘RENTED’, or ‘SOLD’. Over time, as records are created and edited, free-text columns accumulate inconsistencies that silently break filter and count formulas since ‘Active’ and ‘ACTIVE’ are treated as different values by Power Apps string comparisons.
– Performance Degrades as Files Grow
Excel workbooks were designed for human-readable spreadsheet data, not as database backends for applications. As row counts grow, Excel files become slower to open, slower to save, and more fragile. Large Excel files on OneDrive are particularly prone to sync delays, partial saves, and corruption none of which surface as clean errors in a connected Power Apps application.
2. Why Dataverse Is the Better Choice?
– Full Delegation — No Row Ceiling
Microsoft Dataverse is a fully delegable data source in Power Apps. This means that filter, search, sort, and aggregation operations are executed directly on Dataverse’s servers, and only the matching rows are returned to the app. There is no local row ceiling. An app connected to a Dataverse table with one million rows can filter, search, and count across all of them with exactly the same accuracy and performance as one with a hundred rows.
– Built for Multi-User Concurrent Access
Dataverse is a relational database service purpose-built for multi-user business applications. It handles concurrent reads and writes from many users simultaneously without data corruption or file-locking issues. Multiple team members can add, edit, and delete records at the same time with full transactional safety.
– Choice Columns — Enforced Data Quality
Dataverse supports Choice columns (also called option sets), which restrict a column’s value to a predefined list of valid options. A Sale Status Choice column with options ACTIVE, RENTED and SOLD cannot contain any other value, not a typo, not a variant capitalization, not a blank. This enforcement happens at the database level, not just at the form level, which means data quality is guaranteed regardless of how records are created or imported.
– Row-Level and Column-Level Security
Dataverse has a comprehensive, role-based security model that controls exactly who can read, create, edit, and delete records. Security can be applied at the environment level, the table level, the column level, and even the individual record level. For example, a broker can be restricted to seeing only their own listings, while an administrator can see all listings across all brokers without any formula changes in the app itself.
– Native Integration with Power Apps and the Microsoft Ecosystem
Dataverse is Microsoft’s recommended data platform for Power Apps, Power Automate and Dynamics 365. It is natively integrated connections are faster, more reliable, and require less configuration than third-party or file-based data sources. Features like server-side sorting, advanced filtering, and automatic audit columns (Created On, Modified By) are available out of the box with no additional setup.
– Audit Logging and Record History
Every Dataverse table automatically tracks when each record was created, by whom, and when it was last modified. This audit trail is built into the platform and requires no additional configuration. For business-critical applications where accountability and traceability matter, this is a significant advantage over Excel, which has no native record-level audit capability.
– Scalability
Dataverse is designed to scale to millions of rows without performance degradation. The same application that starts with a few hundred records can grow to hundreds of thousands without requiring any architectural changes, formula rewrites or data source migrations.
3. Feature Comparison: Dataverse vs Excel
| Feature | Microsoft Dataverse | Excel (OneDrive) |
|---|---|---|
| Row limit in Power Apps | ✓ No limit — full delegation, server-side queries | ✗ Hard cap of 2,000 rows — silent data loss beyond this |
| Multi-user concurrency | ✓ Full concurrent read/write support | ✗ File-level locking — corruption risk |
| Data validation | ✓ Choice columns enforce valid values | ✗ Free-text values allow typos |
| Security model | ✓ Role, row and column-level security | ✗ File-level permissions only |
| Performance at scale | ✓ Handles millions of rows efficiently | ✗ Performance degrades as file grows |
| Power Apps delegation | ✓ Fully delegable (Filter, Search, Sort) | ✗ Mostly non-delegable (2,000-row limit) |
| Concurrent record creation | ✓ Safe transactional writes | ✗ Simultaneous writes may overwrite data |
| Setup complexity | ✓ Requires Power Platform environment | ✗ Just store an Excel file in OneDrive |
| Cost | ✓ Included with Power Apps licensing | ✓ Included with Microsoft 365 |
| Best suited for | ✓ Production apps, multiple users, large datasets | ✗ Prototypes and small datasets (<500 rows) |
4. When to Use Each Data Source
Use Excel when:
- You are building a personal tool or internal prototype that only you will use.
- Your dataset is small and static fewer than 500 rows with no expected growth.
- You do not need filtering, searching, or counting across the full dataset inside the app.
- You need the simplest possible setup with no environment configuration.
- The app will not be shared with other users.
Use Dataverse when:
- Your dataset has more than 500 rows, or is expected to grow.
- The app will be used by more than one person.
- You need accurate search, filter, or count results across the full dataset.
- Multiple users will create or edit records simultaneously.
- You need to enforce valid values for status, category, or type fields.
- The app handles business-critical data where accuracy and auditability matter.
- You need to control which users can see which records (row-level security).
📘 General Rule: If you are building an app that other people will use in a real business context, use Microsoft Dataverse. If you are building a quick personal prototype to explore an idea, Excel is fine as a starting point, but plan to migrate before sharing the app with others.
5. Tutorial: Connecting Your Power Apps App to Dataverse
This section walks you through the complete process of creating a Dataverse table and connecting it to a Power Apps Canvas app. The steps assume you have access to a Power Platform environment with Dataverse provisioned.
👉 Join our Power Apps Training for expert-led, hands-on learning.
Prerequisites
- A Microsoft account with access to make.powerapps.com.
- A Power Platform environment with Dataverse enabled. You can verify this by navigating to make.powerapps.com, clicking the environment selector in the top right corner, and checking that your environment shows ‘Dataverse’ in its details.
- At minimum, a System Customizer or System Administrator security role on the environment, or the ability to create tables (check with your Power Platform administrator if unsure).
- A Power Apps Canvas app already created, or you can create a new blank app as part of this tutorial.
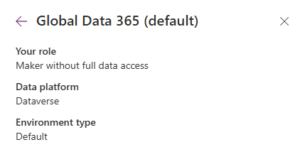
Step 1 — Create a Dataverse Table
A Dataverse table is the equivalent of an Excel sheet it holds your rows of data, with each column representing a field. Unlike Excel, each column has a defined data type that enforces what kind of data it can hold.
- Go to make.powerapps.com and confirm you are in the correct environment using the environment selector in the top right corner.
- In the left sidebar, click Tables.
- Click + New table at the top of the page.
- A menu appears with options for how to start. Select New table (blank) to define the table structure manually. Alternatively, select Start with data from Excel or CSV if you have existing data to import, see Step 3 for the import-specific flow.
- In the table creation panel, enter a Display name for your table. This is the name that will appear in Power Apps formulas and the Data pane.
- Review the auto-generated Plural name Dataverse auto-pluralises the display name, but sometimes generates awkward results (e.g. ‘Propertieses’). Correct this manually if needed.
- Click Create. Dataverse will provision the new table, which takes a few seconds.
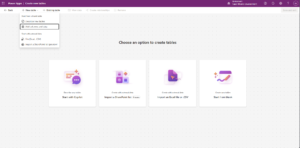
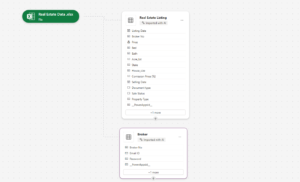
💡 Tip: Keep your table name simple and consistent with any existing formula references in your app. If your app currently references a data source called ‘Table1’, naming your Dataverse table ‘Table1’ means your existing formulas won’t need to be updated.
Step 2 — Add Columns to the Table
Every Dataverse table comes with a set of built-in system columns (Created On, Modified By, Owner, etc.). You add your own columns on top of these to store your application’s data.
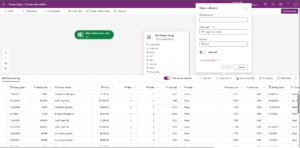
- Inside your new table, click the Columns tab.
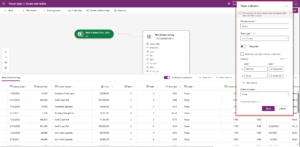
- Click + New column to open the column creation panel.
- Enter a Display name for the column.
- Select a Data type from the dropdown. The most commonly used types are:
- Text — for names, descriptions, addresses and any free-form string data.
- Number — for quantities, counts, and non-currency numeric values.
- Currency — for monetary values provides built-in formatting and currency handling.
- Date and Time — for dates, timestamps, and scheduling fields.
- Choice — for fields with a fixed set of valid options (e.g. status fields, category fields). Strongly recommended over Text for any column where only specific values are valid.
- Yes/No — for boolean true/false fields.
- If you selected Choice, a Choices section appears below. Click + New choice to add each valid option. Enter the Label (the human-readable text) for each option the Value (a numeric ID) is auto-generated and does not need to be set manually.
- Set the Required field to Business Required for any column that must always have a value. This prevents records from being saved with empty required fields.
- Click Save to create the column.
- Repeat for each column your app needs.
⚠ Important: For any column where only specific values should be allowed, such as a Status or Category field, always use a Choice column instead of Text. A Text column accepts any input, including typos, inconsistent capitalization and accidental extra spaces, all of which can silently break Filter, Count and other formulas in your Power Apps later.
Step 3 — Import Existing Data from Excel (Optional)
If you have existing data in an Excel file that you want to move into Dataverse, you can import it directly without manually entering each row.
- Inside your table, click the Data tab.
- Click Add data → Import from Excel (the exact label may vary slightly depending on your environment version look for an option referencing Excel, CSV, or file import).


