- In the Name field, type a name for the calculated measure.
- In the Associated Measure Group dropdown select the measure group.
- In the Format string field, specify how you want the numeric results displayed.
- Check the Visible box if you want the value to be displayed in the front-end application.
- In the Non-empty behavior list, select the measure or measures used to resolve NONEMPTY queries in MDX. This is optional and by default left blank.
Want to turn raw ERP data into powerful business insights?
👉 Join our Jet Analytics Training and master building data warehouses, cubes, and advanced dashboards.
👉 Join our Jet Analytics Training and master building data warehouses, cubes, and advanced dashboards.
In the Expression field, write an MDX statement or, in the Measures list, drag the measures to be used into the workspace in the middle.
- Drag and drop any relevant item from the list on the right-hand side into the Expression field.
- All mathematical symbols are allowed to create your calculation.
- Your expression should only contain the definition of your MDX query.
- In general, this will be everything following your initial ‘AS’ statement yet before your ‘SELECT’ statement.
Overview
The article explains how to create a calculated measure and set its various attributes such as Name, Associated Measure Group, Format string etc.
Procedure
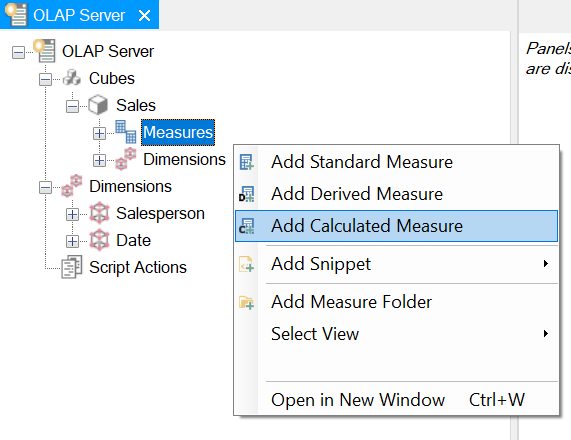
- To create a Calculated Measure within the Jet Data Manager, open your OLAP Server in the Solutions Explorer and expand the ‘Cubes’ tree. Once there expand the cube that you would like to create a Calculated Measure for and then right-click on ‘Measures’. This will present you with a menu in which you’ll select ‘Add Calculated Measure’.
- A new window opens with the following selections:
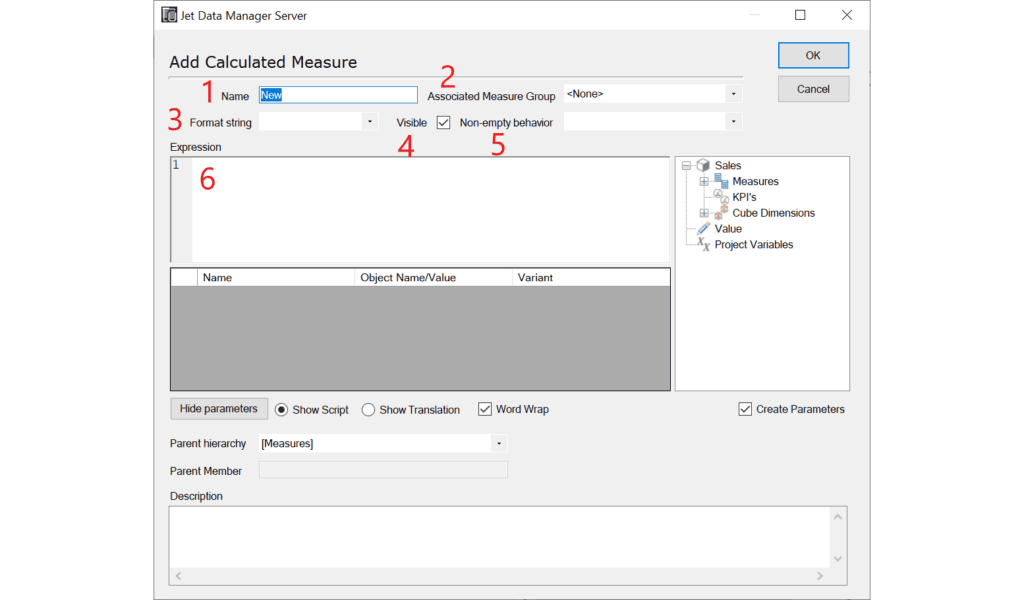
- In the Name field, type a name for the calculated measure.
- In the Associated Measure Group dropdown select the measure group.
- In the Format string field, specify how you want the numeric results displayed.
- Check the Visible box if you want the value to be displayed in the front-end application.
- In the Non-empty behavior list, select the measure or measures used to resolve NONEMPTY queries in MDX. This is optional and by default left blank.
Want to turn raw ERP data into powerful business insights?
👉 Join our Jet Analytics Training and master building data warehouses, cubes, and advanced dashboards.
👉 Join our Jet Analytics Training and master building data warehouses, cubes, and advanced dashboards.
In the Expression field, write an MDX statement or, in the Measures list, drag the measures to be used into the workspace in the middle.
- Drag and drop any relevant item from the list on the right-hand side into the Expression field.
- All mathematical symbols are allowed to create your calculation.
- Your expression should only contain the definition of your MDX query.
- In general, this will be everything following your initial ‘AS’ statement yet before your ‘SELECT’ statement.


